
ChatGPT ads don’t give you much of the targeting you’re used to. There are no keyword lists, no detailed audience builder like Meta’s, and no interest checkboxes. You describe the kind of person you want to reach in plain language (that’s what context hints are for), and OpenAI handles the actual delivery from there.
Custom audiences are the one exception. They’re the single place in ChatGPT ads where you get to bring your own first-party data into the system: your customer list, your leads, your recent purchasers. And because targeting is otherwise a bit of a black box here, that makes them one of the more useful levers you have.
So here’s what custom audiences are, the three ways to use them, and how to set one up step by step.
What custom audiences are in ChatGPT ads
A custom audience is a list of people you upload, matched against ChatGPT’s users, that you can then use as a targeting control inside your campaigns. You provide identifiers like email addresses or phone numbers, ChatGPT matches them to accounts where it can, and you get an audience you can include, exclude, or bid differently on.
It’s the same core idea as a customer match list on Google or a custom audience on Meta. The mechanics and the rules are specific to ChatGPT ads, though, and one rule in particular (the matched-user threshold, more on that below) changes what you can actually do with a list.
The three ways to use a custom audience
There are three things you can do with a custom audience, and they map to very different goals.
- Inclusion targeting. This limits a campaign to people who are in your uploaded audience. You’d use it to run a campaign aimed only at, say, existing high-value customers or a set of warm leads pulled from your CRM. It’s the most precise option, and also the one with the strictest requirement.
- Exclusion. This is the most immediately useful use case for most advertisers. You upload a list of people you don’t want to pay to reach (existing customers, recent purchasers, employees, or anyone who has already converted) and exclude them, so your budget goes toward new prospects instead of the people you’ve already won.
- Bid adjustments. At the ad group level, you can raise or lower your bid when someone belongs to a specific audience. Bid up for previous customers or high-intent leads, bid down for lower-priority users. This lets you keep a broad campaign while still weighting your spend toward the people who are worth more to you.
The 25,000 matched-user rule
Here’s the requirement that trips people up, so it’s worth stating clearly.
To use an audience for inclusion targeting or bid adjustments, you need at least 25,000 matched users. That’s 25,000 users ChatGPT ads can actually match, not 25,000 rows in your uploaded file. If you upload 50,000 emails but only 21,000 match to accounts, you don’t clear the bar. You can find more information in OpenAI’s help article.
Below that threshold, your audience is still usable, but only for exclusions. In practice this is fine, because exclusions are where most smaller advertisers get value anyway, and a modest customer list is plenty to keep from re-advertising to people who already bought.
So before you plan a campaign around inclusion targeting, be realistic about how large and matchable your list actually is.
What data you can upload (and a privacy note)
You can upload a few types of identifier:
- Email addresses
- Phone numbers
- SHA-256 hashed emails or phone numbers, if you’d rather hash them before uploading
- Mobile advertising IDs (for example, Android advertising IDs)
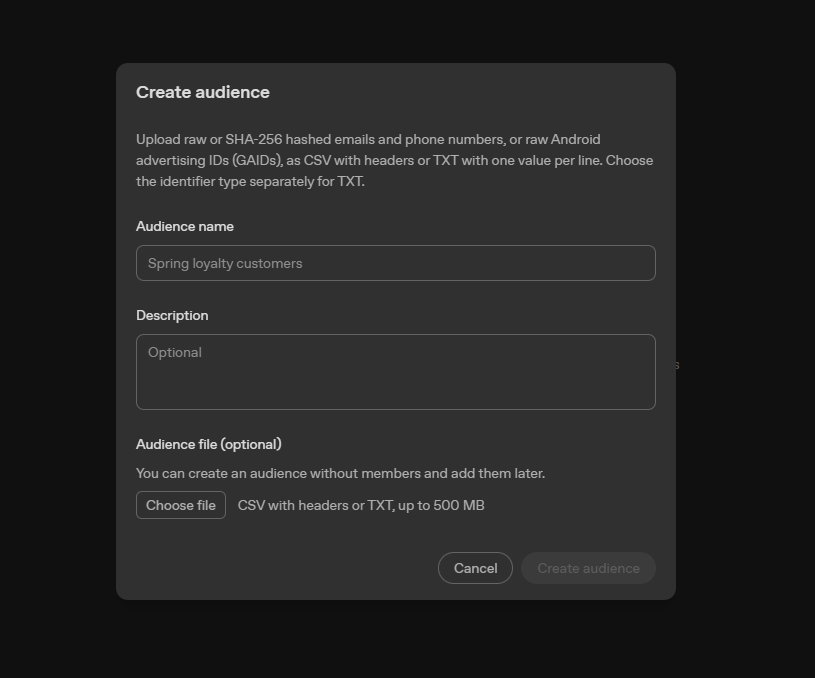
The file itself is simple. A CSV with a header row (just email, or phone number), or a TXT file with one value per line. At the time of writing, uploads can be sizeable (into the hundreds of megabytes), so a large list isn’t a problem.
One thing worth taking seriously: this is sensitive customer data. Don’t dump raw emails into a random spreadsheet without the proper data-processing agreements in place, and store and handle the list securely. Hashing the identifiers before upload is a reasonable extra step if you want to avoid moving raw personal data around.
Find out more about file preparation in OpenAI’s help article.
How to create a custom audience
Once your list is ready, the setup takes a couple of minutes.
- Go to Tools, then Audiences, in the ads manager, and click to create a new audience.
- Name it descriptively. Use something that tells you exactly what the list is, like “Purchasers, last 365 days.” Future you will thank present you when there are five audiences in the account.
- Upload your file. Select your CSV or TXT file in the format above. If you’re using hashed identifiers, upload the hashed version.
- Create the audience and wait for processing. The list takes a little while to process. When it’s done, the status turns green and shows as ready.
- Check the matched-user count. This is the number that decides what you can do with it. If it’s under 25,000 matched users, the audience is exclusion-only. If it’s above, you can also use it for inclusion targeting and bid adjustments.
How to use a custom audience in a campaign
How you apply the audience depends on which of the three jobs you’re using it for.
As an exclusion
This is the path for lists under the 25,000 threshold, and the most common one overall. In campaign setup, find the audience settings and add your list under excluded audiences. Click into the field, select your custom audience, and that’s it. Anyone on that list is now filtered out of the campaign.
As inclusion targeting
If your audience has more than 25,000 matched users, you can build a campaign that targets only those users. You set the custom audience as an included audience during campaign creation, and the campaign becomes eligible to serve only to people on your list.
As a bid adjustment
Bid adjustments happen at the ad group level, and they’re tucked away, so here’s where to look. Open your ad group, set your maximum CPC bid as usual, then expand the advanced or additional settings. There you’ll find audience bid adjustments, where you apply a multiplier to raise or lower your bid for a selected audience. Choose the audience you want to weight, set the multiplier, and ChatGPT will bid more or less for those users accordingly. As with inclusion, this needs an audience above the matched-user threshold.
Which approach should you actually use?
A quick way to decide:
- If you have a modest customer list, use it for exclusions. Keeping your ads from re-serving to existing customers is a genuine, immediate saving, and it works at any list size.
- If you have a large, well-matched list of high-value customers, inclusion targeting lets you run a focused win-back or upsell campaign to exactly those people.
- If you want the best of both, run a broad campaign but layer bid adjustments on top, bidding up for your best-fit audiences and down for the rest.
And a reminder that ties back to the wider platform: custom audiences are your first-party data lever, but they don’t replace context hints. You’ll usually combine a strong context hint (describing who you want to reach and why) with an audience control (excluding the people you’ve already got). If you haven’t set up a campaign yet, start with the full guide to setting up your first ChatGPT ads campaign and add custom audiences once the basics are in place.
Get your list in early
Custom audiences are one of the few precise controls ChatGPT ads gives you, and the setup is quick, so there’s little reason to skip them. Even a simple exclusion list of existing customers will make your spend work harder from day one.
Start with the list you already have, upload it, check the matched-user count to see what you’re allowed to do with it, and build from there. Pair your audiences with proper ChatGPT ads conversion tracking so you can actually see what those refined lists deliver once they’re live. And keep one limitation in mind: the ads manager only ever shows your own numbers, so if you want to see how competitors are showing up, you can monitor ChatGPT ads via Rankshift for that competitive view. As your account matures and your matched audiences grow, the more advanced inclusion and bid-adjustment options open up, and you’ll already know how to use them.
