
Most of the attention around ChatGPT ads has gone to the sponsored text placements that sit under an answer. But if you sell physical products, the format worth your time is shopping ads: a scrollable carousel of product cards that appears at the bottom of a conversation, each showing your brand, product name, price, availability, and a link straight to your store.
Shopping ads are a more natural fit for ChatGPT ads than most formats. They’re visual, they’re commercial, and they line up with the fact that ads currently reach free users, who skew consumer rather than business. The catch is that they run entirely off a product feed, so almost all of the work (and almost all of the results) comes down to getting that feed right.
Here’s how to set ChatGPT shopping ads up properly, from feed to live campaign, plus the practical tips that make the difference.
What ChatGPT shopping ads are
When someone asks ChatGPT something with buying intent, a row of sponsored product cards can appear beneath the answer. The user scrolls through the products and clicks through to your site to buy.
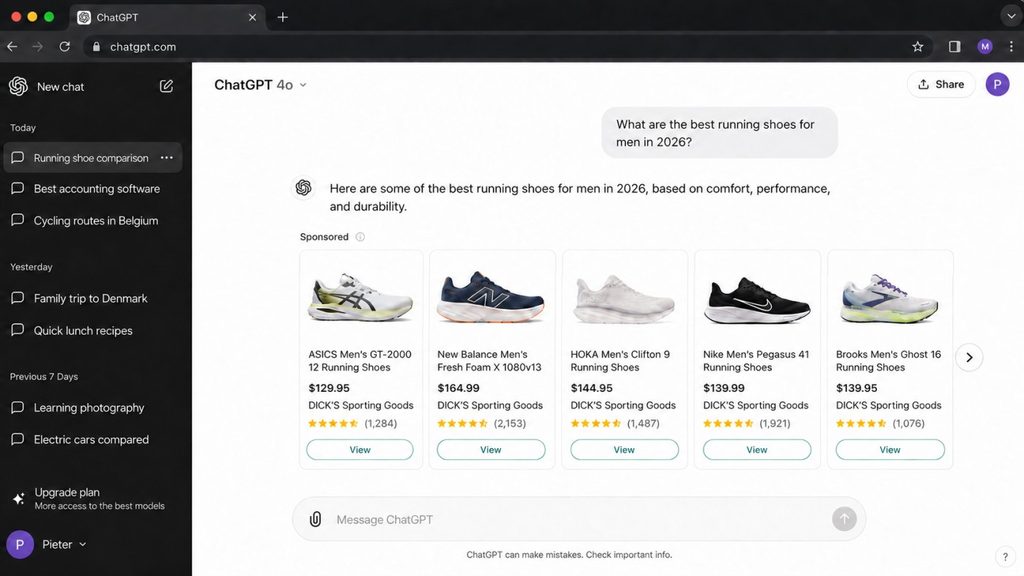
Each card is generated from your feed, so a card typically shows the product name, an image, the price, stock status, and delivery information. You’re not writing individual ad copy the way you would for a text placement. Instead, the quality of your feed is the quality of your ads. If your feed is accurate and well-structured, your cards look good and stay eligible. If it’s stale or incomplete, your campaign underdelivers before it even gets going.
A couple of things to know going in, the same as with any ChatGPT ad: only free users see ads, and ads don’t appear in sensitive contexts like health or politics. If you haven’t run any ChatGPT ads before, it’s worth starting with the full guide to setting up your first ChatGPT ads campaign for the account basics, then coming back here for the shopping piece.
Before anything else: get your feed clean
This is the step that decides everything downstream, so do it first.
Your product feed pulls from your store, and the cards ChatGPT shows are only as good as the data behind them. Before you touch the ads manager, make sure your prices, stock status, images, titles, and descriptions are all accurate and current. A wrong price or an out-of-stock product in your feed doesn’t just look bad. It actively suppresses delivery, because the platform favors relevant, correct listings.
If you already keep a Google Merchant Center feed or run a Shopify store, you’ve got a strong starting point. You’ll just need to get that data into the format ChatGPT ads expects, which is the next step.
Step 1: Create a feed in the ads manager
In the ads manager, go to Tools, then Feeds, and create a new feed. You’ll see three ways to connect one:
- CSV or TXT upload. The simplest option and the best way to get started. Good for smaller catalogs and occasional manual updates.
- Hosted URL. You host your feed file at a URL and ChatGPT pulls from it, the same way Merchant Center works. This suits large catalogs that change often, and the import can be scheduled. If the URL needs authentication, you can add a username and password.
- SFTP connection. A server-to-server option for more automated setups.
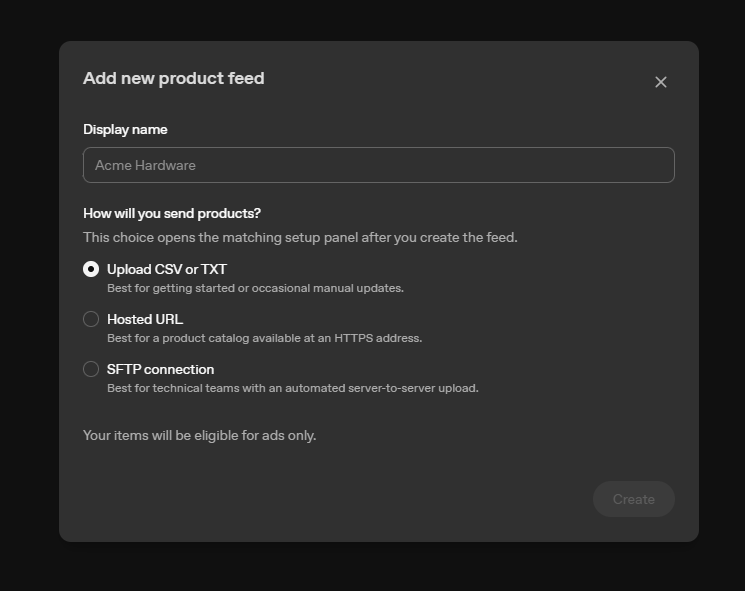
For your first campaign, start with the CSV or TXT upload. You can always move to a hosted URL later once you know the format works and you want automatic refreshes.
Step 2: Map your feed to ChatGPT’s format
Here’s the part people underestimate. A ChatGPT ads shopping feed is not identical to a Google Merchant Center feed. The attributes are different, so you can’t just drop your existing Merchant Center or Shopify export straight in and expect it to work. You need to map your fields to OpenAI’s fields.
Inside the feed setup you can see the file mapping between your input columns and OpenAI’s fields. Some fields are required, some are advised, and some are optional. Alongside the familiar attributes (title, price, image, link), there are ChatGPT-specific eligibility attributes worth understanding:
- Search eligibility, which controls whether a product can surface in ChatGPT’s search results.
- Checkout eligibility, for whether a product can be bought through the relevant flow.
- Ads eligibility, for whether a product can be advertised.
You can set these on or off per product depending on how you want each item to behave.
You have two realistic routes to get your data into this format. You can map the fields manually from a Shopify product export or a Merchant Center CSV, which is fine for a small catalog. Or you can use one of the conversion tools that take a standard product export and output a ChatGPT-compatible feed, which saves time on larger catalogs. Either way, the goal is the same: a file where every product is recognized and mapped to the right OpenAI fields.
Watch for two common issues while you’re preparing the file:
- Duplicates. Duplicate items get dropped, so clean them out before uploading.
- Missing GTIN or MPN. Products without these identifiers often trigger warnings. They can still be recognized, but it’s worth adding the identifiers where you have them.
Step 3: Upload and validate
Once your file is ready, upload it to the feed you created, validate it, and confirm the update. Processing takes a little while, so refresh the ads manager after a moment.
Don’t skip reading the validation output. It tells you exactly what happened: how many products were found, how many were dropped, and how many rows were filtered out by feed rules, along with any warnings. If you uploaded 22 products and only see a handful recognized, the validation summary is where you find out why.
When the feed status moves from processing to uploaded, open the product view to check your items came through correctly, with the right prices and URLs. Once they’re advertised, this is also where you’ll see spend, impressions, and clicks per product.
Step 4: Create the shopping campaign
With a clean feed in place, the campaign setup is quick.
Go to Campaigns, create a new campaign, and choose the shopping or product feed type. Then:
- Select your product feed. Pick the feed you just uploaded.
- Set your location targeting. Choose the country you’re selling into, and use location exclusions to keep the campaign tight. Targeting one country per campaign at first keeps things clean.
- Set your bid strategy at the ad group level. As with other ChatGPT ad types, clicks-based bidding is the reliable place to start while conversion optimization on the platform matures.
- Use product filters to segment. This works like product groups in a Google Shopping campaign. You can filter the products in an ad group by an attribute, for example only including items where the title contains a certain word. That lets you build focused ad groups (by category, product line, or promotion) rather than throwing your whole catalog into one bucket.
- Configure the ad. The product title feeds in directly from your feed, and you choose which image field to use (the main image URL, an additional image, or a mobile image). Preview it to check the card looks right.
Publish, and your shopping campaign is live.
Step 5: Track your shopping conversions
Shopping ads are only worth running if you can see what they sell, so get tracking in before you scale. The setup uses the same pixel as any other ChatGPT ad, with the commerce events that match a store: items added, checkout started, and order created, fired at the relevant steps. The full walkthrough is in the ChatGPT ads conversion tracking guide.
Keep your expectations calibrated while you read the numbers. The reporting is still shallow, you can’t see which conversations triggered your cards, and the ads manager only ever shows your own performance. If you want to see how competitors are showing up in ChatGPT ads, that’s not something the dashboard reveals, and you can track ChatGPT ads via Rankshift for that competitive view.
A few practical tips
To get the most out of ChatGPT shopping ads once you’re set up:
- Treat the feed as a living thing. Refresh it regularly so prices and stock stay accurate. A hosted URL with scheduled imports makes this easier than manual re-uploads once your catalog is stable.
- Make sure your store name matches. The store name in your feed setup needs to match the name registered on your ads account, or the feed won’t behave.
- Invest in your images. The card is mostly the image and the price, so a clean, clear product image does more work here than clever copy would.
- Segment with product filters. Grouping products into focused ad groups gives you at least some read on what’s performing, which matters when the platform’s own reporting is thin.
- Exclude people who’ve already bought. If you upload a customer list as a custom audience in ChatGPT ads, you can exclude recent purchasers so you’re not paying to re-reach them.
- Start narrow. One country, a clean subset of your catalog, and a small test budget will teach you more than launching everything at once.
Get your feed right, and the rest follows
Shopping ads are the ChatGPT ad format where preparation pays off most directly. There’s no headline to agonize over and no clever targeting to fine-tune. There’s just your feed, your product data, and how accurately the two reflect what you actually sell.
So spend your time upstream. Clean the feed, map it to OpenAI’s format properly, validate it, and keep it fresh. Do that well and a shopping campaign is genuinely fast to launch, and you’ll be showing up in a place most of your competitors haven’t reached yet.
